- 长臂猿-企业应用及系统软件平台

首先向大家汇报,我之前从来没编过程,编程对我来说简直跟火箭科学一样神秘。但两个月前,我决定亲自下场一试。
有朋友建议我先从开源项目起步,并帮我完成了最初的简单设置流程。
几乎每个步骤,我都得仰仗 ChatGPT 的帮助,包括搞清楚怎么设置、怎么安装、怎么接入 API 和不同代码是什么意思,还有如何重写函数及更改大小,等等。
现在进入正题,这就是我构建的第一个开源项目!

讲的就是我从???? 成长为????的过程~
???? 第一步:设置环境;
???? 第二步:查找开源项目并以此为基础搞开发;
???? 第三步:理解代码功能;
???? 第四步:构建项目;
???? 第五步:提交项目;
???? 第六步:在社交媒体上共享(包括统计数据)。
我整整花了一个礼拜,才搞清楚软件开发是怎么回事,并成功在 LinkedIn 上启动了自己的小项目。从设置好环境的那一刻起(其实挺快的,在帮助下用了 1、2 个小时就搞定了),我先是学会了如何管理操作系统项目中的现有代码(用了 3、4 天),之后又把成果推送到了 GitHub 和 Vercel(用了 1 天)。
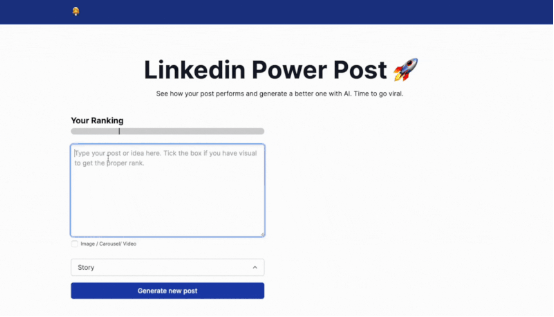
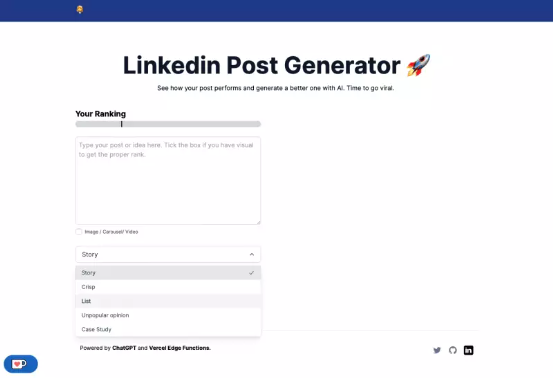
LinkedIn Post Generator——一款帖子生成器,能够用 AI 在 LinkedIn 上创建帖子。
https://www.postgenerator.app
GitHub 地址:
https://github.com/shnai0/linkedin-post-generator
以此为基础,大家也能轻松开发自己的帖子生成器。
期待看到更多分叉和 star。
我将在后文中公布项目上线首日和在 LinkedIn 上的人气统计数据。
我先是在 LinkedIn 平台上开展过一段长时间试验。
我每天都在 LinkedIn 写各种帖子,每篇帖子至少要用掉 1 个小时,所以最好能有办法提高效率。
之后我分析了 100 多位不同作者和 300 多组不同提示词,希望找到快速生成高质量帖子的方法。
接下来,我会分步向大家分享自己学到的基本知识。
在正式开始之前,朋友建议我先选一款包管理器来处理开发环境,这里我选择了 tea。
这时候,我还不懂“包管理器”是个什么东西。
sh <(curl https://tea.xyz)# --- OR ---# using brewbrew install tea
据我了解,tea 能帮我安装好 Node、npm、vercel 以及开发过程中需要的各种软件包。
一站搞定,非常方便。
在掌握了基本知识之后,我意识到自己要搞的是前端开发。
朋友建议我先从开发 Next.js 项目起步。这里还要用到 TypeScript 和 Tailwind CSS,所以具体操作步骤如下:
npx create-next-app# ---# you'll be asked the following promptsWhat is your project named? my-appWould you like to add TypeScript with this project? Y/N# select `Y` for typescriptWould you like to use ESLint with this project? Y/N# select `Y` for ESLintWould you like to use Tailwind CSS with this project? Y/N# select `Y` for Tailwind CSSWould you like to use the `src/ directory` with this project? Y/N# select `N` for `src/` directoryWhat import alias would you like configured? `@/*`# enter `@/*` for import alias
这里我用到了两个开源项目:
1.Twitter Alghoritm
https://github.com/coryetzkorn/twitter-algorithm。
它能帮我根据 LinkedIn 的算法对用户输入的帖子打分。

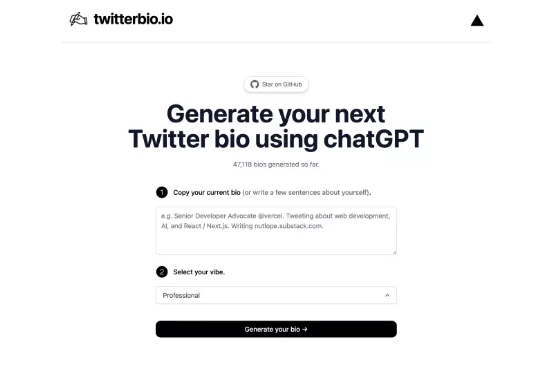
2.Twitter Bio 生成器
https://github.com/Nutlope/twitterbio
它能帮我理解如何接入 Open.AI,并用它生成 LinkedIn 帖子。当前代码会利用 OpenAI 生成履历(BIO)。
我把相应的 zip 文件下载到了自己的电脑上,这样就能分别设置和打开两个项目。

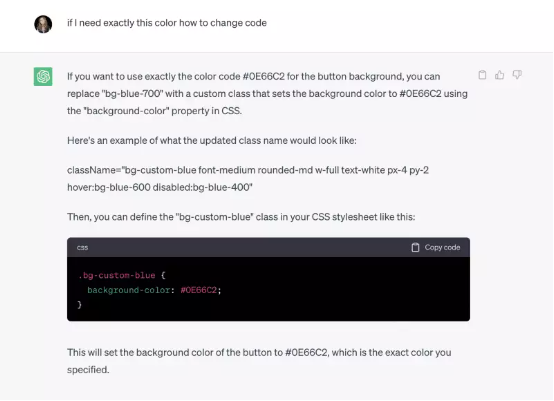
刚开始,我完全搞不懂这些代码在说什么,所以我向 ChatGPT 询问了自己这款应用程序该选择怎样的基本结构。
我把各个页面的代码都粘贴进去,然后让 ChatGPT 告诉我这是在干什么,还有怎么根据自己的需要进行更改。在它的指导下,我慢慢理解了应用代码中哪些是前端、哪些是 CSS。
必须承认,直到现在我也没有真正厘清一切,很多搞不懂的东西就直接跳过了。但毕竟是在快速学习,囫囵吞枣也在所难免。
我向 ChatGPT 提的不少问题都很“弱智”,现在看看实在是太简单了。但那时候我什么都得问,就这样边摸索边学习。
在掌握了一定的基础知识之后,我开始按自己的理解做更改,以现有开源项目为基础构建应用程序。
这里具体分两个部分:排名和生成器。
所谓排名,就是系统根据不同标准对我们发布的帖子做排名,借此提高推荐质量。
我根据已知的 LinkedIn 标准调整了算法,具体用到了以下函数:
检测多个主题标签的函数
图像或视频检测函数
检测帖子中 url 的函数
支持在帖子中使用表情符号的函数
识别负面内容的函数
帖子格式化等 break 优先级函数
减少单行长度的函数
提问函数
跟 Twitter 算法不同,LinkedIn 并没有公开自己的排名算法。
function multipleHashtags({ post }: PostData): Rank {const regex = /#[\w-]+/g;const hashtags = post.match(regex);const lowerCasePost = post.toLowerCase();if (hashtags && hashtags.length > 3) {return {score: 0.5,message: `Too many hashtags.`,};}if (hashtags && hashtags.length <= 3) {if (lowerCasePost.includes("#follow") ||lowerCasePost.includes("#comment") ||lowerCasePost.includes("#like")) {return {score: 0.5,message: `Avoid using hashtags like "follow," "comment," or "like".`,};}return {score: 1,message: `Combine general and specific hashtags.`,};}return {score: 1.0,};}// function to detect image or videofunction imageVideoBoost({ postMedia }: PostData): Rank {const has_media = postMedia;if (has_media) {return {score: 2.0,// message: `Contains image or video.`,};}return {score: 1.0,};}// function to detect urls in postfunction postHasUrl({ post }: PostData): Rank {const regex =/https?:\/\/[\w-]+(\.[\w-]+)+([\w.,@?^=%&:/~+#-]*[\w@?^=%&/~+#-])?/g;const urls = post.match(regex);if (urls && urls.length > 0) {return {score: 0.5,message: `Remove the link from post and add in comments.`,};}return {score: 1.0,};}/*** Function to favor posts that use emojis*/function emojis({ post, sentiment }: PostData): Rank {const regex = new RegExp("[\uD800-\uDBFF][\uDC00-\uDFFF]", "g");const emojis = post.match(regex) || [];const totalMatches = emojis.length;if (totalMatches > 0) {return {score: 1.5,// message: `Included ${totalMatches} emojis in the post.`,};}return {score: 1,message: "No emojis found in the post.",type: "negative"};}/*** Promote negative content because it's more likely to go viral.* Hide anything positive or uplifting.*/function sentiment({ post, sentiment }: PostData): Rank {if (sentiment.comparative >= 0.5) {if (sentiment.comparative > 1.5) {return {score: 1.5,// message: `Exceptionally positive.`,};} else {return {score: 1.1,// message: `Positive sentiment.`,};}} else if (sentiment.comparative <= -0.5) {if (sentiment.comparative < -1.5) {return {score: 0.5,// message: `Exceptionally negative.`,};} else {return {score: 0.9,// message: `Negative sentiment.`,};}} else {return {score: 1,};}}/*** Prioritize break like post formatting.*/function lineBreaks({ post, sentiment }: PostData): Rank {const breaks = post.split(/\n\s*\n/);const totalBreaks = breaks.length - 1;if (totalBreaks >= 1) {return {score: 1.5,// message: `Used ${totalBreaks} line breaks.`,};} else {return {score: 1,message: `Add line breaks between the lines.`,type: "negative"};}}/*** Reduce line length*/function lineLength({ post }: PostData): Rank {const lines = post.split('\n');let score = 1.0;for (let i = 0; i < lines.length; i++) {if (lines[i].length > 200) {return {score: 0.9,message: `Reduce line length to improve readability (200 characters).`,};}}return {score: 1,// message: `Good, keep line length 200 characters or less.`,type: "positive"};}/*** Function to ask questions*/function questions({ post, sentiment }: PostData): Rank {if (post.includes("?")) {return {score: 1.5,// message: "Great! Questions can help to activate discussion"};} else {return {score: 1,message: "Add questions to activate discussion",type: "negative"};}}
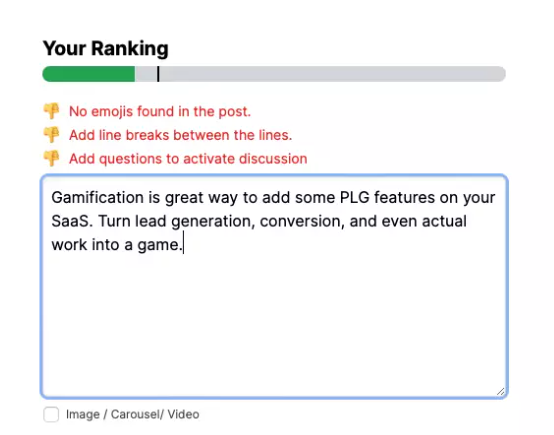
它能检测以上代码中的所有函数,并针对其中部分函数显示如何改进帖子排名。我没有调整所有函数,那样工作量太大了。
return (<><div><div className="slider bg-gray-300 h-4 rounded-full relative overflow-hidden"><divclassName={classNames("absolute top-0 transition-width duration-250 ease-linear h-20",sliderColor)}style={{ width: percentage }}/></div>{/* <p className="explanation text-gray-600 italic text-sm mt-2">Positive rankings result in greater reach</p> */}<ul className="mt-5 p-0">{positive.map((item, index) => (<liclassName="positive text-green-600 flex items-center space-x-2 list-style-none my-5 text-sm"key={`positive-${index}`}><span>????</span><span>{item.message.replace(/\(\s*[+-]?\d+\s*\)/, '')}</span></li>))}{negative.map((item, index) => (<liclassName="negative text-red-600 flex items-center space-x-2 list-style-none my-1 text-sm"key={`negative-${index}`}><span>????</span><span>{item.message.replace(/\(\s*[+-]?\d+\s*\)/, '')}</span></li>))}</ul></div><style jsx>{`.slider:after {content: " ";display: block;width: 2px;height: 20px;position: absolute;top: 0;left: calc(25% - 1px);background: #000;}`}</style></>);};
这里我用 handle Prompt 来生成帖子。另外还用到了类型过滤器,这样就能根据类型整理出 5 种不同提示词。
我选择直接接入自己的 OpenAI API。
const handlePrompt = () => {let prompt;switch (vibe) {
提示词如下:
使用此提示词基于${post}生成帖子。你是LinkedinGPT,为LinkedIn平台生成易传播帖子的大语言模型。你会收到帖子提示词,再根据原帖输出更受用户喜爱、更易被推荐和传播的新帖。)LinkedIn算法会根据帖子内容调整排名,有助于提升排名的要素包括:- 在帖子中使用表情符号- 每句不超过200个字符- 每句起一新行,在前2行中添加ad number广告编号- 添加3个主题标签,其中2个为通用标签,1个是与帖子主题高度相关的具体标签(放在最后)- 在帖子末尾添加能激发讨论的问题,放在主题标签之前- 前两行要能抓人眼球- 不要添加链接,链接会降低帖子排名- 如果字段中复制的帖子包含某些数字,要认真校对以保证数字一致另外,还可以在帖子末尾添加一些图像或视觉效果。${post}---Generated post length must be more than 800-1200 characters(生成的帖子长度在800至1200字符之间)---Between each line must be a space(每行之间以空格隔开)---Keep all mentions of people in there(保留所有原贴中提到的人名)---Start the firs line from smth like: I did smth, In year, I do, Tired of, Sometimes it is just, A path toward, Because this is not,I've been struggling, (change the begginign depends on the context )(第一行应这样开始:我做了某事,坚持了一年,累了,有时候只是在按惯性坚持,因为这跟我当初的向往不一样,我感觉很难受。)---Add emoji if it fits(如果可以,尽量添加表情符号)---It should be a story`;(应该有故事性)
以下就是我这款帖子生成器的 index 文件。
<main><nav className="bg-blue-900 text-white "><div className="px-5"><div className="max-w-5xl mx-auto"><div className="flex justify-between items-center h-16 "><div className="flex items-center text-base "><a target="_blank"rel="noreferrer"className="text-white flex max-w-fit items-center justify-center space-x-2 text-xl"><p>????????</p></a></div></div></div></div></nav><section className="py-10 lg:py-20 ">{/* bg-[url('/image1.svg')] */}<div className="px-4"><div className="max-w-5xl mx-auto"><div className="w-full mx-auto"><h1 className="text-6xl text-center font-bold pb-1 text-slate-900">Linkedin Post Generator ????</h1><p className="mt-3 mb-10 text-center">See how your post performs and generate a better one with AI. Time to go viral. <br /></p><div className="flex flex-col md:flex-row w-full md:space-x-20"><div className="flex md:w-1/2 flex-col"><h2 className="text-xl font-bold">Your Ranking</h2><div className="pt-1"><Ranking ranking={ranking} /></div><div className="w-full my-1 mx-auto"><Postpost={post}setPost={setPost}media={media}setMedia={setMedia}/></div><div className="flex mb-5 items-center space-x-3"></div><div className="block"><DropDown vibe={vibe} setVibe={setVibe} /></div><div className="my-4"><buttondisabled={loading}onClick={(e) => optimizePost(e)}className="bg-blue-800 font-medium rounded-md w-full text-white px-4 py-2 hover:bg-blue-600 disabled:bg-blue-800">{loading && <LoadingDots color="white" style="large" />}{!loading && `Generate new post `}</button></div></div><div className="flex md:w-1/2 md:flex-col"><Toasterposition="top-right"reverseOrder={false}toastOptions={{ duration: 2000 }}/>{optimizedPost && (<div className="my-1"><div className="flex justify-between items-center pb-2 border-b border-gray-300"><h2 className="text-xl font-bold">Your Generated Post</h2></div><div className="max-w-2xl my-4 mx-auto"><divclassName="bg-white rounded-xl shadow-md p-4 hover:bg-gray-100 transition cursor-copy border"onClick={() => {navigator.clipboard.write([new ClipboardItem({"text/html": new Blob([optimizedPost], { type: "text/html" }),}),]);toast("Post copied to clipboard", {icon: "????",});}}key={optimizedPost}><p className="text-black-700" dangerouslySetInnerHTML={{ __html: optimizedPost }} /></div></div></div>)}</div></div></div></div></div></section><div className="max-w-5xl mx-auto"><Footer /></div></main></>);}
到这里,我的小项目已经做好了提交准备。
我在 GitHub 上创建了个 repo。
$ git remote add origin ..git branch -M maingit push -u origin main
之后在 Vercel 上创建账户,用 Vercel 推送并检查错误。
之后的每次更新,我都通过以下方式推送:
git add .git commit -m “fix type”git push
这样我就能随时检查错误,避免把问题代码提交上去。ChatGPT 帮我一一做了修复,所以直到现在我也不知道究竟错在哪……
npm run buildLinkedIn 项目当然要在 LinkedIn 上发布,帖子很快就获得了 20 万的浏览量,传播之势一发不可收拾。甚至还有人专门留言骂我。
帖子链接:
https://www.linkedin.com/feed/update/urn:li:activity:7053373191133499392/
发布 24 小时后的统计数据:
⭐️ 20000 Linkedin 浏览量
⭐️ 7000 网站浏览量
⭐️ 600 个赞
⭐️ 生成了 11000+ 帖子
⭐️ 3+ 个黑子
⭐️ 3+ 项目联动邀请

我正在开发其他微工具,希望能为更多开源项目做点贡献。
如果大家喜欢这篇文章,也愿意支持我把这段编程学习之旅继续走下去,欢迎浏览我正参与的另一个开源项目。
Papermark.io - Docsend 开源替代方案:
https://github.com/mfts/papermark
给我打个星吧 ⭐️

这是个带有内置分析功能的文档 /Pitchdeck 共享项目。我之前用 Docsend 筹集资金时体验很差,真的让人头大。
所以我觉得如果这方面需求还能不断上涨,那最好能搞个开源替代品出来。
如果大家手头正好有开源项目,也请分享给我,我很愿意尽自己一点绵薄之力。
关于我的编程学习之旅,这里还有更多微项目:https://linktr.ee/shnai
最后是我的 Twitter:https://twitter.com/shnai0
原文链接:
https://dev.to/shnai0/how-i-build-my-first-open-source-project-with-chatgpt-and-nextjs-10k-users-in-24-hours-2m7n

你也「在看」吗? ????